
Laptop Audio Restoration Tips: Solutions for Non-Functional Internal Speakers

Laptop Audio Malfunction? Here Are Effective Solutions
When no sound is coming from your laptop, it can be frustrating. The no sound issue occurs can be due to several reasons, like faulty audio drivers. To get the sound back, just follow the instructions below. Apply to Windows 10, 7, 8.
Firstly, Ensure the audio device is enabled
If the speakers are disabled, you can’t hear sound. Follow steps below to check for it.
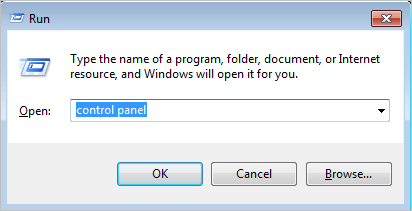
- On your keyboard, press theWin+R (the Windows logo key and the R key) at the same time to invoke the run box. Type control panel in the run box then click theOK button.
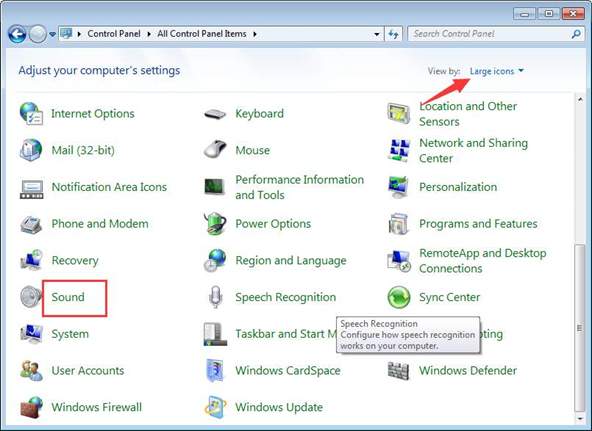
- View by large icons and click Sound .
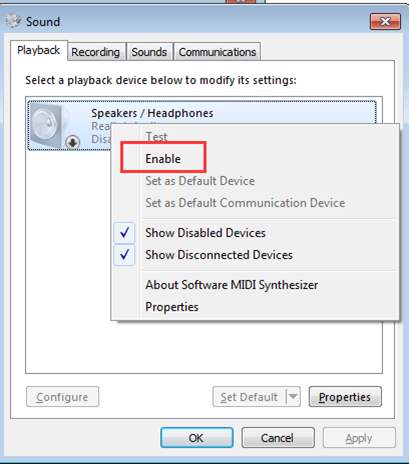
- See the Speakers is disabled:
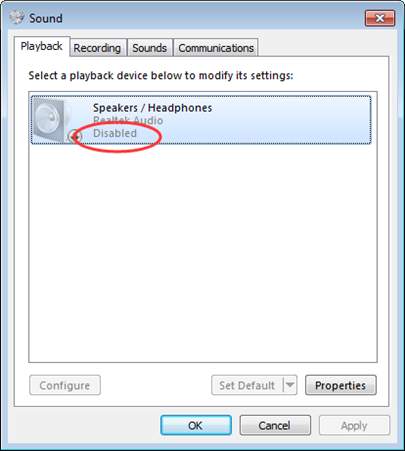
If it is disabled, right click on it and select Enable .
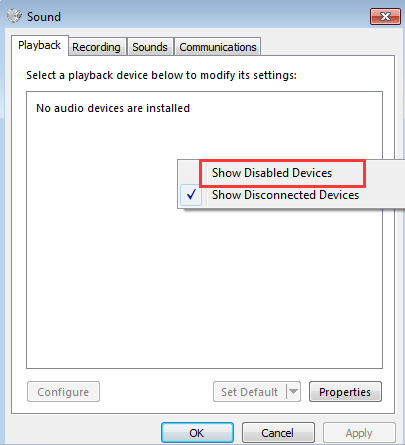
If you don’t see Speakers option listed, it could be disabled and hidden. Right click on the blank space and select Show Disabled Devices . Then Enable it.
Secondly: Ensure the sound is not muted
It could happen that the sound is muted by accident. Check the speaker icon at the bottom left corner of desktop, and make sure there is no red circle with a cross going through it.
If you ensure above sound settings have no problems, move on and try the below methods.
Method 1: Disable the audio device in Device Manager and restart your PC
Follow these steps:
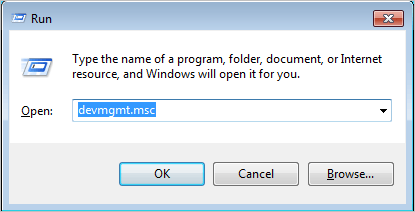
- On your keyboard, press theWin+R (the Windows logo key and the R key) at the same time to invoke the run box. Typedevmgmt.msc in the run box then click theOK button.
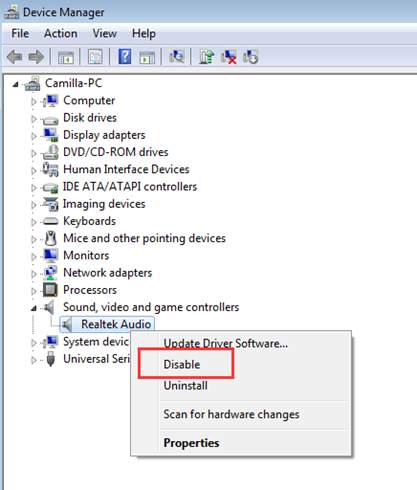
- Expand the category “Sound, video and game controllers “. Under this category, right-click on the audio device name. A context menu will pop up, then select Disable .
- Restart your PC. Then a Window will pop up to ask you to solve the sound problem. Just follow the on-screen instructions. Then the sound issue should resolve.
Method 2: Update the audio driver
The problem can be caused by faulty audio drivers. The above steps above may resolve your laptop no sound issue, but if they don’t, you can update the audio driver. If you don’t have the time, patience or computer skills to update the audio driver manually, you can do it automatically with Driver Easy .
Driver Easy will automatically recognize your system and find the correct drivers for it. You don’t need to know exactly what system your computer is running, you don’t need to risk downloading and installing the wrong driver, and you don’t need to worry about making a mistake when installing.
You can update your drivers automatically with either the FREE or the Pro version of Driver Easy. But with the Pro version it takes just 2 clicks (and you get full support and a 30-day money back guarantee):
Download and install Driver Easy.
Run Driver Easy and click Scan Now . Driver Easy will then scan your computer and detect any problem drivers.

- Click the Update button next to a flagged audio driver to automatically download the correct version of this driver, then you can manually install it (you can do this with the FREE version).
Or click Update All to automatically download and install the correct version of all the drivers that are missing or out of date on your system (this requires the Pro version – you’ll be prompted to upgrade when you click Update All).

Hopefully you can fix your laptop no sound issues with the steps above. If you have any questions, please feel free to leave your comment below.
Also read:
- [New] 2024 Approved Expert's Guide to Achieving Screencasting Perfection with Mobizen
- [New] Melodic Migration 6 Preferred Free Apps for Moving YouTube Audio on Android for 2024
- [New] OpenPlayClip Your Free Pass to Perfect Gamers' Recordings for 2024
- [Updated] 2024 Approved Eight-in-One Recorders Free, Fast, and Flexible for Android Users
- [Updated] In 2024, God of Thunder Returns Epic Dawn
- Easy Troubleshooting Guide for Unresponsive PC Speakers
- Essential Guide: Fixing Voice Chat Glitches in Apex Legends
- Expert Advice on Repairing Your Device's Broken Stereo Mix Function
- Fixing Audio Issues in JBL Reflect Mini Wireless Headphones - Quick Solutions
- Fixing the Quiet Zone: Troubleshooting No Audio Issues with Conexant SmartAudio on Windows 10
- Fixing the Silent Problem: Solutions for No Sound on Your HP Notebook
- Fixing the Sound Glitch: How to Restore Audio on Your Windows Machine During a Zoom Meeting
- In 2024, How to Fix My ZTE Nubia Z60 Ultra Location Is Wrong | Dr.fone
- In 2024, How to Transfer Contacts from Vivo Y78t to iPhone XS/11 | Dr.fone
- In 2024, What is the best Pokemon for pokemon pvp ranking On Xiaomi Redmi K70E? | Dr.fone
- Ultimate Guide: Connecting Your Logitech Mouse Perfectly
- Title: Laptop Audio Restoration Tips: Solutions for Non-Functional Internal Speakers
- Author: Donald
- Created at : 2025-01-01 01:43:29
- Updated at : 2025-01-04 01:07:24
- Link: https://sound-issues.techidaily.com/laptop-audio-restoration-tips-solutions-for-non-functional-internal-speakers/
- License: This work is licensed under CC BY-NC-SA 4.0.